
Introduction: Why Eyes Matter in Drawing
Eyes are often called the “window to the soul,” and in art, this is especially true. When you sketch a face, the eyes instantly capture attention and define emotion, mood, and personality. A small change in shape or shading can completely transform the expression of your drawing.
Many beginners struggle at first because eyes seem complicated. But once you understand structure, light, and proportions, everything becomes easier. With practice, even simple sketches can look alive and expressive.
In this guide, you’ll learn step-by-step techniques that help you build confidence in eye sketching. If you are just starting your artistic journey, understanding how to draw eyes properly will dramatically improve your portrait skills and overall drawing quality.
The goal is not perfection from day one but steady improvement through observation and repetition. Let’s begin by breaking down the foundation of eye construction in a simple and practical way.
Understanding Eye Anatomy in Simple Form

Basic Structure You Should Know
Before putting pencil to paper, it’s important to understand what you are actually drawing. The eye is not a flat shape—it is a spherical structure sitting inside a socket, surrounded by muscles, skin, and fat layers.
The visible part includes the iris, pupil, eyelids, lashes, and highlights. Each element plays a specific role in creating realism.
When learning how to draw eyes, you should always think in three dimensions instead of flat outlines. This mindset alone can improve your sketches significantly.
The upper eyelid is more active and usually casts a soft shadow over the eyeball, while the lower lid is smoother and subtler in shape. Understanding this helps you avoid flat-looking drawings.
Breaking Down the Eye Into Simple Shapes
Every complex drawing begins with simple geometry. The eye can be simplified into an almond shape, a circle, and curved lines for eyelids.
Start with a light oval to represent the eye socket. Inside it, place a circle for the iris. Then add a smaller circle for the pupil.
This method ensures correct proportions before detailing begins.
When practicing how to draw eyes, always focus on construction first and detailing later. This prevents mistakes that are difficult to fix in later stages.
Think of it like building a house—you need a strong foundation before decorating the walls.
Essential Tools for Better Eye Sketching
You don’t need expensive materials to create beautiful drawings. A few basic tools are enough to get started.
Pencils like HB, 2B, and 4B are ideal for sketching and shading. HB is perfect for light outlines, while softer pencils like 2B and 4B help create depth and shadows.
A blending stump or tissue can help smooth transitions between tones. An eraser, especially a kneaded one, is useful for highlights and corrections.
Understanding your tools improves your control and precision. When working on how to draw eyes, the right pencil pressure and shading technique matter more than expensive supplies.
Step-by-Step Eye Drawing Process
Creating the Basic Outline
Start by lightly sketching the eye shape. Keep your lines soft so you can adjust proportions easily.
Draw an almond-like outline, then add the iris and pupil inside. Make sure the iris is partially hidden under the upper eyelid for realism.
This small detail instantly improves the natural look of the drawing.
If you are serious about learning how to draw eyes, always compare both eyes in a face to ensure symmetry and balance.
Adding Eyelids and Structure
Next, define the upper and lower eyelids. The upper lid should have more weight and slightly overlap the iris. The lower lid is softer and more curved.
Add thickness to the eyelids to create depth. Avoid drawing single thin lines, as real eyelids have volume.
At this stage, your drawing should already look like a structured eye rather than just lines on paper.
Shading for Depth and Realism
Shading brings life to your sketch. Light and shadow determine how realistic your eye appears.
First, identify your light source. Then begin shading the opposite side of the light gently.
The upper eyelid creates a shadow over the iris, while the inner corners are usually darker.
When practicing how to draw eyes, focus on smooth transitions rather than harsh shading. Gradual tones make the eye look more natural and three-dimensional.
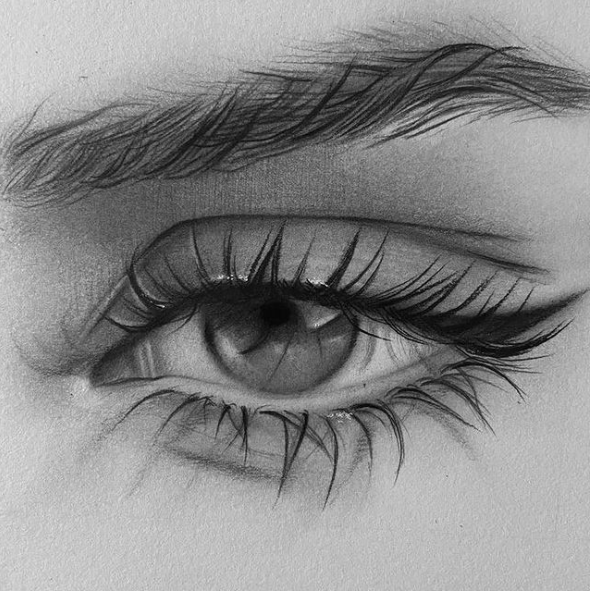
Understanding Light, Reflection, and Texture
Light reflection is what makes eyes look alive. A small white highlight in the iris creates the illusion of moisture.
The iris itself is not flat—it has radial texture lines that spread outward from the pupil. These lines should be lightly sketched for realism.
Avoid over-detailing, as too much texture can make the drawing messy.
Subtlety is key in advanced eye sketching.
Comparison of Eye Drawing Styles
| Style Type | Characteristics | Difficulty Level | Best Use |
|---|---|---|---|
| Realistic | Detailed shading, anatomy-based | High | Portrait art |
| Anime | Large expressive eyes | Medium | Stylized illustration |
| Cartoon | Simple shapes, minimal shading | Easy | Beginners |
| Sketch Style | Loose lines, expressive focus | Medium | Concept art |
Understanding different styles helps you decide your artistic direction and improves flexibility in drawing techniques.
Common Mistakes Beginners Make
Flat and Lifeless Eyes
One of the biggest mistakes is ignoring shading depth. Without proper light and shadow, eyes appear flat.
When learning how to draw eyes, always think about volume and curvature instead of just outlines.
Incorrect Proportions
Eyes that are too large or too small compared to the face can break realism. Always measure spacing carefully.
Overworking Details
Too many lines in the iris or lashes can reduce realism instead of improving it. Simplicity often looks more natural.
Practice Methods to Improve Faster
Daily Sketch Exercises
Draw eyes from different angles every day. Focus on front view, side view, and tilted angles.
This builds muscle memory and improves accuracy.
Expression Studies
Try drawing happy, sad, angry, and surprised eyes. Each emotion changes eyelid shape and iris position.
Practicing how to draw eyes through expressions helps you understand emotional storytelling in art.
Reference Observation
Use real-life photos or mirrors to study eye structure. Observation is one of the fastest ways to improve drawing skills.
Advanced Techniques for Realistic Results
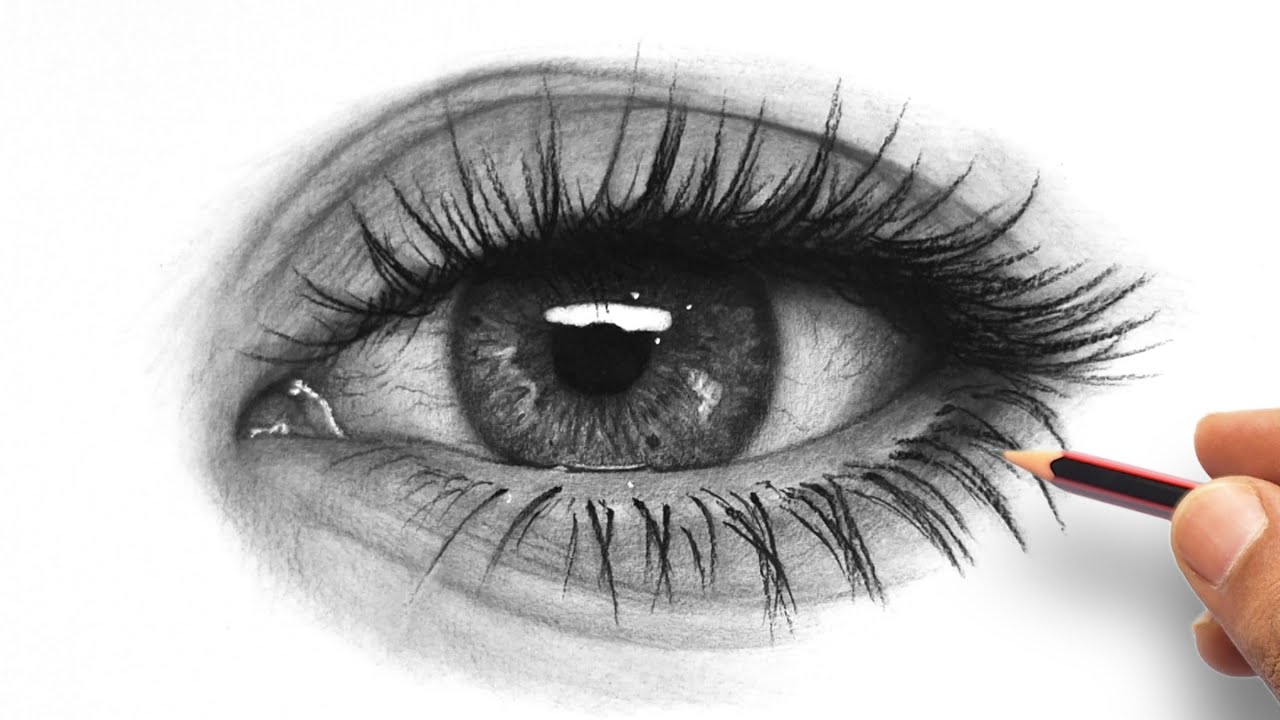
Once you are comfortable with basics, start focusing on subtle details like skin texture, soft shadows, and tiny reflections.
The iris should have layered tones instead of a single flat color. The pupil should remain the darkest point.
Adding slight redness near the inner corner can also increase realism.
At this stage, your understanding of how to draw eyes becomes more intuitive, and your sketches begin to feel more natural.
Always leave a small white reflection spot in the iris before shading. This instantly adds life and realism to your eye drawings.
Frequently Asked Questions (FAQs)
1. What is the best way for beginners to start eye drawing?
Start with simple shapes like circles and almond outlines before adding details.
2. Why do my eyes look unrealistic?
Most likely due to poor shading, incorrect proportions, or lack of highlights.
3. How long does it take to learn eye sketching?
With regular practice, noticeable improvement can be seen within a few weeks.
4. Which pencil is best for shading eyes?
Soft pencils like 2B and 4B are ideal for smooth shading and depth.
5. Do I need to learn anatomy?
Basic anatomy understanding helps greatly in improving realism and structure.
6. How can I make eyes look more expressive?
Focus on eyelid position and eyebrow movement, as they define emotion.
7. Is reference necessary for learning?
Yes, references are extremely helpful for understanding real structure and lighting.
Conclusion: Building Confidence Through Practice
Learning to draw eyes is not about instant perfection—it’s about steady improvement and observation. Every sketch you create adds to your understanding of structure, shading, and emotion.
When you focus on patience and consistency, your results naturally improve over time. The more you practice, the more intuitive drawing becomes.
Mastering how to draw eyes allows you to bring emotion and realism into your portraits. It transforms simple sketches into expressive artwork that connects with viewers.
Keep practicing, study real references, and experiment with styles. With time, your confidence and skill will grow, and eye drawing will become one of your strongest artistic abilities.
